
Craving something fancy but easy to make? Try this chicken and cheese jalousie recipe! Flaky puff pastry, creamy cheese, and juicy chicken come together in the perfect bite. I made this once for my family, and it was gone in minutes. It’s simple, fun, and works for any occasion. Let’s get started!
What Is a Chicken and Cheese Jalousie?
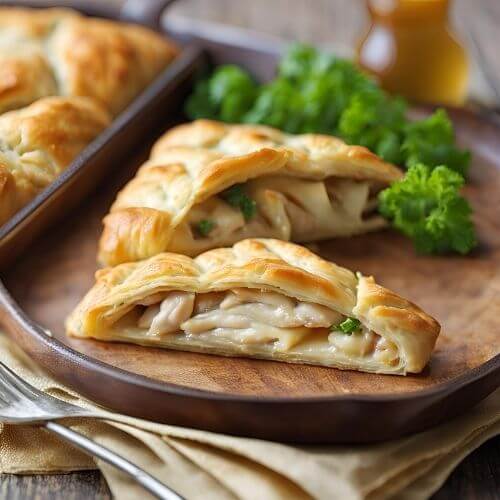
A chicken and cheese jalousie is like a hidden treasure wrapped in flaky, golden puff pastry. The word “jalousie” actually has French origins and refers to window blinds with slats—just like the vents you see on this pastry, which let the delicious filling peek through while it bakes to perfection. It’s elegant, yet incredibly simple to make, making it a fantastic recipe for both casual dinners and special occasions.
So, why chicken and cheese? Well, it’s a pairing that never fails. The savory, juicy chicken perfectly complements the creamy, melty cheese, creating a balance of flavors that feels both hearty and indulgent. Add a touch of seasoning, and you’ve got a dish that’s hard to resist.
The beauty of this dish lies in its versatility. Hosting a party? Slice it into smaller portions for easy finger food. Preparing a family meal? Serve it alongside a fresh salad for a comforting dinner. You can even make it ahead of time, freeze it, and bake it fresh when needed. It’s the kind of recipe that adapts to your needs, whether you’re feeding picky eaters or impressing guests.
Ingredients You’ll Need
Simple Ingredients for an Easy Recipe
Here’s everything you’ll need to create this delicious chicken and cheese jalousie. You probably already have most of these ingredients in your kitchen!
- 1 sheet of puff pastry (thawed if frozen)
- 1 cup cooked chicken, shredded or diced (rotisserie chicken works great!)
- 1 cup shredded cheese (cheddar, mozzarella, or a mix)
- 2 tablespoons sour cream or cream cheese (for extra creaminess)
- 1 egg, beaten (for the golden egg wash)
- 1 teaspoon garlic powder
- 1 teaspoon onion powder
- Salt and pepper, to taste
- Optional: fresh parsley or chives, chopped (for garnish)
Pro Tips for Success
- Ingredient Swaps: No time to cook chicken? Use store-bought rotisserie chicken or leftover grilled chicken. Don’t have sour cream? Greek yogurt works just as well.
- Cheese Options: While cheddar is a classic choice, feel free to experiment with gouda, Swiss, or even a spicy pepper jack for some kick.
- Seasoning Additions: If you like bolder flavors, sprinkle in smoked paprika or Italian seasoning.
This recipe is super forgiving. It’s all about using what you have on hand, so don’t stress about finding the “perfect” ingredients. Even pantry staples like canned chicken or pre-shredded cheese can work in a pinch!
Step-by-Step Instructions
How to Make Chicken and Cheese Jalousie: Easy Directions
Making a chicken and cheese jalousie is simpler than you think. Follow these steps, and you’ll have a delicious pastry that looks (and tastes) like it came from a fancy bakery. Let’s dive in!
1. Prep the Puff Pastry
Start by thawing your puff pastry if it’s frozen. Keep it cold but pliable—it’s much easier to work with this way. Roll it out gently on a lightly floured surface until it’s about 1/8-inch thick. This helps create that perfectly flaky texture.
💡 Pro Tip: Always keep your puff pastry chilled. Warm dough becomes sticky and hard to handle, so pop it back in the fridge if it feels too soft.
2. Make the Filling
In a mixing bowl, combine your shredded chicken, cheese, sour cream (or cream cheese), garlic powder, onion powder, and a pinch of salt and pepper. Stir everything together until it’s evenly mixed. The creamy texture of the filling ensures it stays moist and flavorful while baking.
💡 Shortcut Idea: Use rotisserie chicken for this step—it’s quick, flavorful, and saves you time!
3. Assemble the Jalousie
Place your rolled-out puff pastry on a lined baking sheet. Spoon the chicken and cheese mixture onto one half of the pastry, leaving about a 1-inch border around the edges. Fold the other half over the filling, like a book, and gently press the edges to seal. Use a fork to crimp the edges for that classic pastry look.
Next, use a sharp knife to cut small slits across the top of the pastry. These vents allow steam to escape and give the jalousie its signature “window” appearance.
💡 Pro Tip: Brush the pastry with beaten egg to get that golden, glossy finish—it makes all the difference in presentation!
4. Bake to Golden Perfection
Preheat your oven to 375°F (190°C). Place the jalousie in the center of the oven and bake for 20-25 minutes or until the pastry is puffed and golden brown. The smell of buttery pastry and cheesy goodness will fill your kitchen—pure magic!
💡 Avoid Soggy Pastry: Let the jalousie cool for 5-10 minutes before slicing. This allows the filling to set and prevents the bottom from getting soggy.
Why This Recipe Works
What Makes This Chicken and Cheese Jalousie So Special?
The first time I made this chicken and cheese jalousie, it was for a cozy family dinner on a chilly weekend. I still remember the way the golden, flaky pastry emerged from the oven, filling the house with its buttery aroma. Everyone gathered around the table, and before I even had a chance to serve seconds, the entire dish was gone! It wasn’t just the taste that made it a hit—it was how effortlessly it brought everyone together.
This recipe is special because it’s so easy to prepare. With just a handful of ingredients and simple steps, you can whip up something that looks like it came from a high-end bakery. The puff pastry does all the heavy lifting, while the chicken and cheese filling delivers a comforting, crowd-pleasing flavor combination. It’s the kind of dish that impresses without stress—perfect for when you want something both elegant and approachable.
Another reason this recipe works so well is its flexibility. Whether you’re cooking for picky kids or adventurous foodies, you can tweak it to suit any palate. Need a gluten-free option? Use gluten-free puff pastry. Want a vegetarian twist? Swap the chicken for sautéed mushrooms or spinach. The recipe adapts to your needs, making it a go-to for busy weeknights or special gatherings alike.
And let’s not forget the presentation—those signature slits on top are not just functional but also make the dish visually stunning. It’s the kind of meal that gets people asking, “How did you make this?” while you secretly smile, knowing how easy it was to put together.
In a nutshell, this chicken and cheese jalousie is all about comfort, versatility, and a little bit of flair. It’s proof that great food doesn’t have to be complicated—it just needs the right combination of flavors and a sprinkle of love.
Variations and Serving Suggestions
Get Creative with Your Jalousie
This recipe is easy to change based on what you like. Want it spicy? Prefer a Mediterranean touch? Making it for kids? There’s a way to make it work!
- Spicy Kick: Like heat? Add diced jalapeños or red pepper flakes. Swap in pepper jack cheese for an extra zing.
- Mediterranean-Inspired: Use feta cheese instead of cheddar. Add fresh spinach and a bit of oregano. A drizzle of olive oil makes it even better.
- Kid-Friendly Version: Keep it mild with extra cheese and simple seasoning. Mozzarella or cream cheese makes it extra gooey. Cut into small pieces for easy snacking!
What to Serve with Chicken and Cheese Jalousie
This flaky pastry is great alone, but sides make it a full meal. Try these ideas:
- Fresh Side Salad: A crisp salad with lemon dressing balances the richness. Arugula, cherry tomatoes, and cucumbers work well.
- Cozy Soup: Tomato or roasted red pepper soup pairs perfectly. The crispy pastry and warm soup are a tasty combo!
- Dipping Sauces: Add extra flavor with dips! Garlic aioli gives a creamy, garlicky taste. Marinara sauce adds a tangy contrast. Even honey mustard works well.
This jalousie is all about easy, delicious food. Try a version, pick a side, and enjoy a meal that feels special every time!
Storage and Reheating Tips
Got leftovers? No problem! This jalousie stores well and tastes great later. Follow these easy tips to keep it fresh and crispy.
How to Store Leftovers
For short-term storage, put leftovers in a sealed container. Keep them in the fridge for up to 3 days.
Want to save it longer? Freeze it! Wrap slices in plastic wrap. Then, put them in a freezer-safe bag. It stays good for 2 months.
💡 Quick Tip: Label it! That way, you remember when you stored it.
Best Ways to Reheat
Want a crispy crust? Avoid the microwave—it makes the pastry soft. Try these instead:
- Oven or Toaster Oven (Best!): Heat to 350°F (175°C). Bake for 8-10 minutes.
- Air Fryer: Set to 350°F. Heat for 5-7 minutes.
- Skillet: Heat on low for a few minutes on each side.
💡 Pro Tip: Don’t cover it! Covering traps steam and makes it soggy.
Can You Meal Prep It?
Yes! Make it ahead and freeze it before baking. When ready, bake straight from the freezer. Just add a few extra minutes to the cooking time.
Now you know how to store and reheat it the right way. No more soggy leftovers—just fresh, flaky bites every time!
Expert Tips for Perfect Jalousies
Want your jalousie to turn out flaky, golden, and irresistibly delicious? These pro tips will help you get it just right!
1. Keep Your Puff Pastry Cold
Puff pastry needs to stay cold to bake properly. If it gets too warm, the butter melts before hitting the oven, and you lose that flaky magic. Keep it in the fridge until you’re ready to use it. If it softens while handling, pop it back in the fridge for 10 minutes before continuing.
💡 Quick Tip: If you’re rolling out the pastry, work on a chilled surface like a marble countertop to keep it cool.
2. Don’t Overfill the Jalousie
It’s tempting to stuff as much filling as possible inside, but too much can lead to leaks and a soggy pastry. Aim for a thin, even layer, leaving about an inch of space around the edges for sealing.
💡 Pro Tip: If your filling feels too wet, mix in a little breadcrumbs or grated cheese to absorb excess moisture and keep things tidy.
3. Seal the Edges Like a Pro
A well-sealed jalousie locks in the filling and keeps everything crisp. Use a fork to crimp the edges or lightly brush with a beaten egg before pressing the pastry together. This helps it stick better and gives a golden finish when baked.
💡 Bonus Hack: If you want an extra fancy touch, use a sharp knife to create a decorative edge or press with a fork in a crisscross pattern.
4. Cut Vents for That Classic Jalousie Look
The slits on top aren’t just for show—they let steam escape so the pastry stays crisp and doesn’t puff up unevenly. Use a sharp knife to make evenly spaced slits before baking.
💡 Pro Tip: If you want a super crispy top, brush the jalousie with an egg wash (a mix of beaten egg and a little water) before baking.
5. Bake It Right for a Flaky Finish
Preheat your oven to 375°F (190°C) and make sure it’s fully heated before you put the jalousie in. Puff pastry needs high heat to rise and crisp up properly. Avoid opening the oven door too often, as temperature drops can affect the texture.
💡 Time-Saving Trick: For an extra crispy bottom, bake on a preheated baking sheet or a pizza stone. This gives the pastry an instant hit of heat from below.
6. Let It Cool Before Slicing
Fresh out of the oven, the filling is piping hot and the pastry is delicate. Give it 5-10 minutes to cool before cutting. This helps the filling set and keeps the bottom from getting soggy.
💡 Serving Idea: Slice it into thin strips for appetizers or larger pieces for a main dish—it’s delicious either way!
Follow these tips, and you’ll have a flaky, golden, and delicious chicken and cheese jalousie every time. Let me know how yours turns out! 😊
Easy, Delicious, and Worth Trying!
And there you have it—a golden, flaky, cheesy delight that’s as easy to make as it is to devour! The beauty of this chicken and cheese jalousie is its versatility. Whether you’re whipping up a quick weeknight dinner or impressing guests with something fancy, this recipe delivers every time.
If you’re new to puff pastry, don’t stress! It’s more forgiving than it looks, and once you get the hang of it, you’ll wonder why you didn’t try it sooner. And if you’re a seasoned cook, this recipe is a fun way to get creative! Swap the filling, add a twist, or make it your own—the possibilities are endless.
So, what do you think? Give it a try! Snap a photo, share your results in the comments, or let me know your favorite twist on the classic jalousie. I’d love to hear how it turned out!
FAQs:
1. Can I use store-bought puff pastry for this recipe?
Yes! Store-bought puff pastry works great and saves time. Just thaw it before use and keep it cold for easy handling.
2. What type of cheese works best in a jalousie?
Cheddar, mozzarella, or Swiss cheese work well. For a bolder taste, try Gruyère or pepper jack.
3. Can I make this chicken and cheese jalousie ahead of time?
Yes! Assemble it, then refrigerate for up to 24 hours before baking. You can also freeze it unbaked for later.
4. How do I keep the pastry crispy when reheating?
Reheat in the oven at 350°F (175°C) for 8-10 minutes. Avoid the microwave, as it makes the pastry soft.
5. Can I make this jalousie gluten-free?
Yes! Use gluten-free puff pastry and check that all other ingredients are gluten-free.
6. What’s the best way to store leftovers?
Store in an airtight container in the fridge for up to 3 days or freeze for up to 2 months.
7. Can I add vegetables to the filling?
Absolutely! Spinach, mushrooms, or bell peppers add extra flavor and texture.
8. How do I prevent the pastry from getting soggy?
Let it cool for 5-10 minutes before slicing. Also, avoid overfilling and ensure the pastry is well-sealed.
9. Can I use rotisserie chicken for this recipe?
Yes! Rotisserie chicken is a quick and flavorful option that saves time.
10. What should I serve with a chicken and cheese jalousie?
Pair it with a side salad, soup, or dipping sauce like garlic aioli or marinara.