Stop buying stock in boxes. The broth inside that carton is just water with salt and flavoring—nothing magical. You can create something infinitely better in your own kitchen using bones, vegetables, and time. Real homemade broth tastes so different that you’ll wonder why you ever bought the commercial version. This chicken soup without stock teaches you that incredible flavor doesn’t come from fancy equipment or exotic ingredients. It comes from understanding technique, respecting time, and following a simple formula.
Restaurant-Quality Broth From Your Kitchen
The difference between this homemade approach and boxed broth is life-changing. When you simmer chicken bones, vegetables, and aromatics together for hours, the bones release gelatin, minerals, and proteins that create a deep, satisfying broth. The longer you cook it, the more flavor extracts. This isn’t just liquid that happens to taste like chicken—it’s real, homemade broth that transforms an ordinary soup into something extraordinary.
Many people think making broth without stock means boiling chicken in water, which sounds unappetizing. That’s not what’s happening here. You’re building layers of flavor by searing aromatics, adding the right vegetables, simmering low and slow, and allowing time to do the work. The result is broth that tastes better than any bouillon cube could ever manage.
Consider pairing this homemade broth base with Quick Shredded Chicken in Pan if you want to prep perfect chicken separately, or use the sear-and-steam technique from Creamy Chicken Soup Without Heavy Cream to make the soup creamier once your broth is ready.
Ingredients for Homemade Broth Base

| Component | Amount | Details |
|---|---|---|
| Chicken | 1.5kg (3.3 lbs) or 4-5 carcasses | Whole chicken cut into pieces, or butcher shop carcasses (often free or cheap). Avoid boneless breasts—you need bones for broth development. |
| Onions | 2 large | Keep papery skin on—it adds color. Cut into chunks. |
| Carrots | 4 large | Cut into chunks. Substantial amount matters for flavor. |
| Celery | 4 stalks | Cut into chunks. Part of the aromatic foundation. |
| Garlic | 6-8 cloves | Leave in skin. Roasting garlic whole adds sweetness. |
| Bay leaves | 2 | Dried. Available in any grocery store. |
| Peppercorns | 6-8 whole | Black peppercorns. Adds subtle heat and depth. |
| Fresh thyme | 3-4 sprigs | Or 1 teaspoon dried thyme if fresh is unavailable. |
| Rosemary | 1 sprig dried | Optional, but adds forest-like depth. |
| Parmesan rind | 1 (optional) | If you save them in the freezer. Adds umami without salt. |
| Water | 3 liters (12 cups) | Cold water. Temperature matters. |
| Salt | 3-5g (½-1 tsp) | Added at the end only, after tasting. |
The vegetable ratio matters significantly. You want approximately a 1:2 ratio of vegetables to chicken bones. Many weak broths result from skimpy amounts of vegetables. Don’t be stingy here—robust vegetables create robust broth.
Detailed Cooking Process
Step 1: Prepare and Sear (15 minutes) — Cut your chicken into pieces and all vegetables into chunks roughly 5-8cm (2-3 inches). Don’t worry about perfect uniformity. Pat the chicken pieces completely dry with paper towels. This is important because you want to sear the chicken, not steam it. Heat 15 ml (1 tablespoon) of neutral cooking oil in your largest pot over medium-high heat. Once the oil shimmers, add chicken pieces in a single layer without crowding. Work in batches if necessary. Let each piece develop a golden-brown color on at least one side—this takes 4-5 minutes. You’re not cooking the chicken through; you’re simply browning the exterior to build flavor through the Maillard reaction. Once browned on one side, transfer to a clean plate. Don’t worry about browning all sides.
Step 2: Build Flavor Base (12 minutes) — Reduce the heat to medium and add your prepared vegetables directly to the pot without washing it first. The browned bits on the bottom are essential—you’ll scrape them up as you cook. Add the onion chunks, carrots, celery, and garlic cloves. Cook for 10-12 minutes, stirring occasionally, until the vegetables soften and the cut surfaces start to take on color. This mirepoix cooking stage forms the foundation of your broth. You’re looking for the vegetables to have a slight golden tint, not raw and pale. This gradual cooking allows their natural sugars to caramelize slightly.
Step 3: Combine Everything (5 minutes) — Return the browned chicken to the pot. Add the bay leaves, thyme sprigs, rosemary sprig, peppercorns, and Parmesan rind if using. Cover everything with cold water—aim for 2.5-3 litres (about 10-12 cups). The liquid should cover the chicken and vegetables by about 2.5cm (1 inch). Too much water creates a weak, watery broth. Too little and you’ll run out of liquid before the broth finishes cooking.
Step 4: Bring to a Boil & Skim (20 minutes) — Bring the pot to a boil over high heat. This will take 15-20 minutes. Once it reaches a rolling boil, you’ll see scum and impurities rise to the surface—a gray-white foam that looks unappetizing. Skim this off with a spoon or fine mesh strainer. This step matters because removing these impurities results in clear, clean broth rather than cloudy, murky liquid. You may need to skim 2-3 times over the first 5 minutes as more rises to the surface. Many recipes skip this step, but it’s the difference between restaurant-quality broth and ordinary soup.
Step 5: Gentle Simmer (3-5 hours) — After skimming, reduce the heat to low and place a lid on the pot, but leave it slightly askew so steam can escape slowly. This is gentle simmering, not boiling. The liquid should barely bubble—just occasional small bubbles breaking the surface. If it’s boiling hard, turn the heat down further. The difference between gentle simmering and boiling is the difference between clear, silky broth and cloudy, broken broth with a separated, greasy appearance. Let the broth simmer for a minimum of 3 hours, ideally 4-5 hours. Every 45 minutes, check the liquid level and add water as needed to maintain the original level. Stir occasionally. This long, slow cooking extracts maximum flavor from the bones, vegetables, and aromatics.
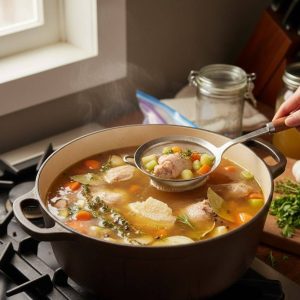
Step 6: Taste & Strain (15 minutes) — After 3 hours, taste the broth. It should taste rich and deeply chickeny, with vegetable undertones. If it still tastes watery or weak, cook another 45 minutes. Once satisfied with flavor depth, remove from heat and let cool slightly. Using a slotted spoon, carefully remove the chicken pieces and vegetables from the pot. The chicken will be incredibly tender—shred it by pulling it apart with two forks. Discard bones, skin, and tough vegetable pieces. Pour the liquid through a fine mesh strainer lined with cheesecloth into another large pot or heat-safe bowl. This straining removes all tiny particles and impurities, leaving you with crystal-clear broth.
Building Your Finished Soup
With your homemade broth ready, return it to the pot over medium heat. You should have roughly 1.5-2 litres (6-8 cups) of broth left after the water has reduced. Add the shredded chicken back in. At this point, you’re building the final soup. Add 200g (2 cups) diced carrots, 100g (1 cup) diced celery, 150g (1 large) diced onion, and 30g (¼ cup) chopped fresh parsley.
Some additions to consider: 200g (1.5 cups diced) potatoes for heartiness, 100g (½ cup uncooked) white rice that will cook in the soup and absorb flavor, or 100g (1 cup) small pasta like ditalini that adds substance. Each addition changes the soup’s character—choose based on your preference and what you have available.
Bring to a gentle boil, then reduce the heat and simmer for 15-20 minutes until the vegetables are tender. Add salt to taste—start with just 3 grams (½ teaspoon) and taste before adding more. Fresh ground black pepper, about 2 grams (¼ teaspoon), finishes it. Add fresh thyme and one bay leaf, then simmer another 5 minutes to let the flavors marry together.

Storage & Make-Ahead Strategy
Your finished soup keeps in the refrigerator for 4-5 days in airtight containers. The broth will gel slightly as it cools—this is the gelatin from the bones and is actually a sign of quality. Before serving, gently reheat on the stovetop over medium-low heat. Don’t boil, as aggressive heat can break the delicate broth structure. Add a splash of water if it’s concentrated too much.
Freeze in portions for up to 3 months in freezer bags or containers. The soup actually improves as it sits—flavors continue developing in both the refrigerator and freezer. When reheating from frozen, thaw overnight in the refrigerator, then reheat gently on the stovetop. This method yields approximately 2 liters (8 cups) of finished soup, serving 4-6 people depending on portion size. A single batch requires about 4 hours of active cook time plus cooling, but most of that is passive simmering. The actual hands-on work is maybe 20-30 minutes spread across the whole process.
FAQs:
Q: Why does my broth taste weak or watery?
Most likely, you didn’t simmer long enough or didn’t use enough vegetables. The broth needs a minimum of 3 hours, preferably 4-5. Weak broth also results from too much water relative to bones and vegetables. Follow the 1:2 vegetable-to-bone ratio and don’t skip ingredients. If broth is already made and tastes weak, simmer it uncovered for another hour to reduce and concentrate flavors.
Q: Can I use chicken breasts instead of bones and carcasses?
Technically, yes, but the results will be inferior. Breasts don’t have enough connective tissue and gelatin to create truly rich broth. Use whole chickens or carcasses. If you only have breasts, use them, but expect thinner broth. Save carcasses from previous meals or ask your butcher for bones.
Q: My broth is cloudy instead of clear. Did I ruin it?
Cloudy broth tastes fine but lacks elegance. This happens when you boil hard instead of simmering gently, or when you don’t skim impurities at the start. The flavor isn’t affected, just the appearance. Next time, simmer very gently and skim properly.
Q: How much does homemade broth cost compared to boxed?
Often significantly less if you source carcasses from a butcher (many are free or under $1). Even buying a whole chicken costs similar to multiple boxes of broth, but yields vastly superior quality. Home broth also has no additives or excessive sodium like commercial versions.
Q: Can I make this in an Instant Pot or a slow cooker?
Yes, though results differ slightly. Instant Pot requires only 1 hour under pressure instead of 3-5 hours on the stovetop (but you lose some of the flavor development). Slow cooker on low for 8-12 hours works well, but takes longer. Stovetop simmering remains the traditional method with the best flavor development.
Final Thoughts
Many people worry that homemade broth will taste weak or be complicated to make. The reality is that if you simmer long enough and use enough vegetables, the broth develops incredible depth. Patience matters more than technique here. The first 2 hours develop basic flavor. The third hour deepens it significantly. The fourth hour rounds out all the edges and creates something truly special. Don’t waste money on store-bought stock once you understand this method. The only advantage commercial stock has is convenience, not quality. Your homemade version will always taste better. Save chicken carcasses and bones in a freezer bag until you have enough to make a big batch. Many butchers have bones available cheaply or free. Make broth once, freeze it in ice cube trays or bags, and you’ll have homemade broth ready whenever you need it. This skill becomes your kitchen superpower—incredible depth of flavor from simple ingredients and patience.

Cooking should be an expression of joy, not a chore! Hi, I’m Martina G. Peare, owner of RecipeTalkToday, a recipe creator dedicated to keeping things real, simple, and flavorful. I hope this recipe brings a little magic to your table today. Did you try this recipe? I’d love to hear how it turned out! Leave a comment below or tag me in your kitchen creations. Let’s make your kitchen the happiest place in your home.