Skip the jar and discover how to make restaurant-quality chicken gravy at home in under 10 minutes using just five pantry staples. This simple, foolproof recipe works with or without pan drippings and transforms any meal into pure comfort.
Why This Recipe Works
Making homemade chicken gravy doesn’t require fancy techniques or hard-to-find ingredients—just basic pantry staples you likely already have on hand. This easy chicken gravy recipe is specifically designed for busy home cooks who want quick, flavorful gravies without the complicated steps or lumps that often plague homemade attempts. Whether you’re making gravy for roasted chicken, fried chicken, mashed potatoes, or holiday meals, this foolproof approach delivers smooth, creamy, savory results every single time. The secret lies in creating a proper roux (butter and flour base), which takes just a minute to master. Unlike store-bought gravy packets or canned options, this homemade chicken gravy recipe uses fresh chicken broth and real butter for authentic flavor that tastes genuinely homemade. Once you master this simple gravy technique, you’ll never resort to processed alternatives again—and it’s so quick that you can make fresh gravy anytime you want that rich, savory comfort food touch.
Ingredients
Basic Simple Chicken Gravy (Makes approximately 480 ml / 2 cups)
- 60g (4 tablespoons) unsalted butter
- 30g (¼ cup) all-purpose flour
- 480 ml (2 cups) low-sodium chicken broth or chicken stock
- 2g (¼ teaspoon) salt (adjust to taste)
- 1g (⅛ teaspoon) black pepper (adjust to taste)
Optional:
| Category | Ingredient | Quantity | Notes |
|---|---|---|---|
| Extra Flavor | Garlic powder | 2g (½ tsp) | — |
| Onion powder | 2g (½ tsp) | — | |
| Dried thyme or Italian seasoning | 1g (¼ tsp) | — | |
| Paprika | 1g (¼ tsp) | Optional, for color | |
| With Pan Drippings | Reserved pan drippings (strained) | 240 ml (1 cup) | Replaces 1 cup broth |
| Low-sodium chicken broth | 240 ml (1 cup) | Use less salt if drippings salty | |
| Salt | 2g (½ tsp) | Reduce if needed | |
| Black pepper | 1g (⅛ tsp) | — | |
| Creamier Gravy | Heavy cream or sour cream | 60 ml (¼ cup) | Add at the end |
| Thicker Consistency | Cornstarch | 5g (1 tsp) | — |
| Cold water | 15 ml (1 tbsp) | Mix to make slurry |
Equipment Needed
- Medium saucepan (2–3 quart / 2–3 liter capacity)
- Whisk
- Measuring cups and spoons
- Wooden spoon or silicone spatula
- Strainer or fine mesh sieve (if using pan drippings)
- Instant-read thermometer (optional)
- Measuring scale (optional but helpful)
- Small bowl (for cornstarch slurry, if needed)
Step-by-Step Instructions
Method 1: Basic Simple Chicken Gravy (Without Drippings) – 10 Minutes
Prep Work (1 minute)
Gather ingredients: Ensure all ingredients are measured and ready before you start. This prevents scrambling while the gravy is cooking.
Room-temperature broth: If using cold broth directly from the refrigerator, it may cause lumps. Ideally, let broth sit on the counter for 5 minutes or warm gently in a separate pan.
Making the Roux (3–4 minutes)
Melt the butter: Place saucepan over medium heat. Add unsalted butter (60g / 4 tablespoons) and let it melt completely, about 1–2 minutes. Avoid browning the butter at this stage—you want a pale, foamy consistency.
Add the flour: Once butter is fully melted, add all-purpose flour (30g / ¼ cup) and stir constantly with a whisk. Mix for 1–2 minutes until flour is fully incorporated and you see a smooth paste forming (this is your roux).
Toast the roux: Continue cooking and stirring the roux for 1–2 minutes longer. You’ll notice it starting to smell slightly nutty and turning light golden. This removes the raw flour taste and creates a deeper flavor foundation. Do not let it brown.

Building the Gravy (4–5 minutes)
Add broth slowly: Reduce heat to medium-low. While whisking constantly, slowly pour in the first 120 ml (½ cup) of chicken broth, adding it gradually in a thin stream. Whisk continuously to prevent lumps from forming. This is the critical step—slow and steady prevents lumps.
Incorporate remaining broth: Once the first portion of broth is fully incorporated and smooth, gradually add the remaining 360 ml (1½ cups) of broth while continuing to whisk. The mixture should become noticeably thinner and smoother.
Bring to simmer: Increase heat back to medium and bring the gravy to a gentle simmer, stirring frequently. You’ll notice it gradually thickening as it heats, usually within 2–3 minutes. The gravy will coat the back of a spoon when it reaches proper consistency.Season to taste: Once simmering, add salt (2g / ¼ teaspoon) and black pepper (1g / ⅛ teaspoon). Taste and adjust seasonings as needed. Optional additions: garlic powder (2g / ½ teaspoon), onion powder (2g / ½ teaspoon), or thyme (1g / ¼ teaspoon).
Final simmer: Allow the gravy to simmer for 1–2 minutes on medium-low heat, stirring occasionally. This melds the flavors and ensures proper thickening.
Finishing Touches
Check consistency: If gravy is too thick, whisk in additional broth by the tablespoon (15 ml at a time) until you reach desired consistency. If too thin, simmer an additional 2–3 minutes to reduce and thicken further, or use cornstarch slurry (see variations).
Optional creaminess: For a richer, creamier gravy, stir in 60 ml (¼ cup) heavy cream or sour cream just before serving. Stir constantly and avoid boiling once cream is added.
Serve immediately: Pour hot gravy into a gravy boat or directly over your dish. Serve while hot for best flavor and texture.
Method 2: Chicken Gravy With Pan Drippings – 12 Minutes
Prep Work (2 minutes)
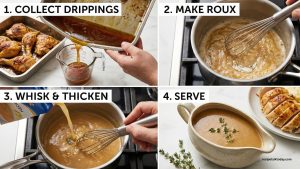
Collect drippings: After roasting chicken, carefully pour all liquid and drippings from the roasting pan into a heatproof measuring cup or bowl. Tilt the pan away from your body to avoid burns.
Separate fat: Let the drippings sit for 1 minute. The fat will naturally rise to the top, leaving the flavorful liquid (called “au jus”) at the bottom. Skim off most of the fat using a spoon, leaving approximately 30g (2 tablespoons) of fat in the drippings for the roux.
Strain drippings (optional): Pour drippings through a fine mesh strainer to remove bits of meat, bone, or vegetables. This isn’t strictly necessary but creates a cleaner, silkier final gravy.
Making Roux with Drippings (2–3 minutes)
Create roux with reserved fat: Place saucepan over medium heat. Use the reserved 30g (2 tablespoons) of chicken fat from the drippings instead of butter (or combine 15 ml / 1 tablespoon fat with 15 ml / 1 tablespoon butter if you don’t have enough fat).
Add flour: Once fat is hot, add all-purpose flour (30g / ¼ cup) and whisk constantly for 1–2 minutes to create a smooth paste (roux). Toast for an additional 30–60 seconds until it smells slightly nutty.
Building Gravy with Drippings (4–5 minutes)
Add drippings first: Reduce heat to medium-low. Slowly pour in the strained drippings (240 ml / 1 cup), whisking constantly to prevent lumps. The drippings contain rich chicken flavor from the roasting process.
Add remaining broth: Gradually whisk in additional chicken broth (240 ml / 1 cup) until smooth and fully incorporated.
Simmer and thicken: Increase heat to medium and bring to a gentle simmer. Stir frequently as the gravy thickens, usually within 3–4 minutes. It’s ready when it coats the back of a spoon.
Season carefully: Add seasonings to taste, keeping in mind that drippings already contain salt from the roasted chicken. Start with just ½ teaspoon salt and adjust after tasting. Add black pepper (1g / ⅛ teaspoon) to taste.
Serve: Pour into a serving vessel and serve immediately over chicken, mashed potatoes, stuffing, or other comfort foods.
Method 3: No-Flour Gravy (Gluten-Free) – 12 Minutes
Using Cornstarch Instead of Flour
Make roux alternative: Melt butter (60g / 4 tablespoons) in saucepan over medium heat as before.
Create cornstarch slurry: In a small bowl, whisk together cornstarch (10g / 1 tablespoon) with 30 ml (2 tablespoons) of cold chicken broth until completely smooth with no lumps.
Add broth: Slowly pour the remaining room-temperature broth (450 ml / 1¾ cups) into the melted butter, whisking as you pour.

Add slurry: Bring the mixture to a boil over medium heat, stirring constantly. Once boiling, reduce heat to medium-low and slowly whisk in the cornstarch slurry.
Thicken: Continue stirring for 1–2 minutes as the gravy thickens. Cornstarch-based gravy thickens quickly and may become even thicker as it cools.
Season and serve: Add salt, pepper, and optional seasonings to taste. Serve immediately.
Note: Cornstarch gravy is slightly more translucent than flour-based gravy but tastes equally delicious and is completely gluten-free.
Variations
Creamy Chicken Gravy
Stir in 60 ml (¼ cup) heavy cream or sour cream during the final minute of cooking. Creates a luxurious, rich gravy perfect for mashed potatoes or chicken. Avoid boiling once cream is added.
Mushroom Chicken Gravy
Sauté 100g (1 cup) sliced mushrooms in the butter before adding flour. Mushrooms add earthiness and depth. Continue with the recipe as directed. Perfect for beef or chicken dishes.
Herb-Infused Gravy
Add 1 teaspoon (2g) fresh chopped thyme, rosemary, or parsley, or 1 tablespoon (3g) chopped fresh sage during the simmering step. Dried herbs (½ teaspoon / 1g each) work too. Creates a sophisticated, herbaceous flavor.
Garlic & Onion Gravy
Add 1 teaspoon (2g) garlic powder, 1 teaspoon (2g) onion powder, and a pinch of paprika (½ teaspoon / 1g) for savory depth. Perfect for fried chicken or roasted vegetables.
White Pepper Gravy
Replace black pepper with ground white pepper for a slightly different, more refined pepper flavor. Also called “classic gravy” in Southern cooking traditions.
Lemon Chicken Gravy
Add 15 ml (1 tablespoon) fresh lemon juice and 2g (½ teaspoon) lemon zest during the final minute of cooking. Adds brightness and tang that cuts through the richness.
Wine-Infused Chicken Gravy
Replace 120 ml (½ cup) of the broth with dry white wine. Add wine during step 6 (when building the gravy). The alcohol cooks off, leaving sophisticated, complex flavor.
Mustard Chicken Gravy
Stir in 10g (2 tablespoons) spicy Dijon mustard or whole grain mustard during the final minute. Creates a tangy, mustard-forward gravy excellent with roasted chicken or pork.
Thick Country Gravy
Increase flour to 45g (6 tablespoons) instead of 30g (¼ cup) for a much thicker, cling-to-the-plate consistency. Popular in Southern comfort food cooking.
Thin, Soup-Like Gravy
Reduce flour to 15g (2 tablespoons) and increase broth to 600 ml (2½ cups) for a thinner, brothier consistency that pours easily.
Substitutions
For Butter
- Olive oil: Use 60 ml (¼ cup) for roux. Creates lighter gravy but lacks some richness of butter.
- Coconut oil (refined): Use 60 ml (¼ cup). Creates neutral-flavored, dairy-free gravy.
- Bacon fat or chicken fat: Use 60 ml (¼ cup) for deeper, more savory flavor. Classic choice for traditional gravy.
- Vegetable oil: Use 60 ml (¼ cup) for neutral, dairy-free option.
For Flour
- Cornstarch: Use 10g (1 tablespoon) per cup of broth. Creates gluten-free, slightly more translucent gravy. Mix with cold liquid first as a slurry.
- Tapioca starch: Use equal amount (30g / ¼ cup). Creates lighter, silkier texture. Results in more transparent gravy.
- Rice flour: Use equal amount (30g / ¼ cup). Creates smooth gravy with slightly different mouthfeel. Good for gluten-free diets.
- Gluten-free flour blend: Use equal amount (30g / ¼ cup) if available. Results closely mirror traditional flour-based gravy.
- Potato starch: Use 15g (2 tablespoons) per cup of broth. Creates glossy, silky gravy. More expensive but excellent results.
For Chicken Broth
- Bone broth: Use 1:1 ratio. Creates deeper, richer flavor with added gelatin for silkier mouthfeel. Premium option.
- Turkey broth: Substitute 1:1 for chicken gravy with slightly different flavor profile. Perfect for Thanksgiving.
- Vegetable broth: Use 1:1 for vegetarian gravy, though flavor will be lighter and less savory.
- Chicken bouillon cubes or paste: Follow package instructions to make equivalent broth (usually 1 cube per 240 ml / 1 cup water). More economical than store-bought broth.
- Homemade chicken stock: Use 1:1 ratio. Creates most flavorful gravy; requires advance preparation.
For Seasonings
- Poultry seasoning blend: Use 1 teaspoon (2g) instead of individual spices for convenience.
- No seasonings: Make plain, neutral gravy perfect for serving alongside various dishes.
- Worcestershire sauce: Add 5 ml (1 teaspoon) for savory, umami depth (especially good with beef gravy twist).
- Soy sauce: Add 5 ml (1 teaspoon) for Asian-inspired umami flavor.
- Fish sauce: Add 2g (¼ teaspoon) for deep umami (use sparingly as it’s potent).
For Creaminess
- Half-and-half: Use 60 ml (¼ cup) for slightly less rich alternative to heavy cream.
- Whole milk: Use 60 ml (¼ cup) for lighter, less decadent creamy gravy.
- Coconut milk: Use 60 ml (¼ cup) for dairy-free, slightly sweet creaminess (use lite coconut milk for less sweetness).
- Greek yogurt: Stir in 60g (¼ cup) at the end (off heat) for tangy creaminess. Add slowly to avoid curdling.
- Sour cream: Use 60g (¼ cup) for tangy, rich addition. Add off heat to avoid curdling.
Mistakes to Avoid
1. Adding Flour Directly to Cold Liquid
This creates lumpy gravy that’s difficult or impossible to fix. Always make a roux (fat + flour) first, then slowly add liquid while whisking constantly.
2. Adding Broth Too Quickly
Rushing the broth addition is the #1 cause of lumpy homemade gravy. Add broth slowly while whisking vigorously. Patience prevents lumps.
3. Using High Heat Throughout
High heat can cause burning or excessive thickening. Use medium heat when building gravy, then medium-low for simmering. Adjust temperature if gravy is simmering too vigorously.
4. Skipping the Roux Toast Step
Not toasting the roux for even 30 seconds means the gravy may taste “flour-y.” The toast step removes raw flour taste and deepens the flavor profile.
5. Using Cold Broth Directly from Refrigerator
Cold broth can cause lumping when poured into the hot roux. Bring broth to room temperature first or warm it gently in a separate pan.
6. Not Whisking Constantly
You must whisk continuously when adding broth to prevent lumps from forming. Stopping or whisking intermittently is a recipe for lumpy gravy.
7. Using Pre-Salted Butter Without Adjusting Salt
If using salted butter, reduce added salt. Drippings also contain salt. Always taste and adjust seasonings—don’t blindly add the full amount called for.
8. Overcooking the Gravy
Cooking gravy too long at high temperatures can cause it to break or become stringy. Simmer gently for 2–3 minutes only, just until thickened.
9. Not Straining Pan Drippings
Bits of meat, bone, or char in drippings can give gravy an unpleasant texture or off-flavors. Strain drippings through a fine mesh sieve for smooth results.
10. Forgetting to Separate Fat from Drippings
If you don’t skim off excess fat from drippings, your gravy may be too greasy. Skim carefully, leaving only 30g (2 tablespoons) fat for the roux.
11. Adding Cream Too Late or Too Hot
If cream is added to boiling gravy, it can separate or curdle. Add cream off the heat or reduce heat to low before stirring it in.
12. Not Checking Seasoning Before Serving
Gravy often needs more salt and pepper than expected. Always taste and adjust seasonings just before serving—gravy served under-seasoned tastes bland.
13. Using Low-Quality or Expired Broth
Poor-quality broth results in poor-quality gravy. Use fresh, good-quality broth or stock. Check expiration dates on store-bought broth before using.
14. Making Gravy Too Thin
Thin gravy slides off food rather than coating it. If gravy is too thin after simmering, either simmer longer to reduce and thicken, or add a cornstarch slurry for quick thickening.
Storage
Refrigerator (Best Short-Term)
- Store cooled gravy in an airtight glass container for up to 4 days
- Pour gravy into container only after it has cooled to room temperature to prevent condensation and watery top layer
- Store in the coldest part of refrigerator (back of bottom shelf, not door)
- Gravy will thicken more as it cools; don’t worry—this is normal
Freezer (Best Long-Term)
- Freeze cooled gravy in airtight freezer-safe containers or freezer bags for up to 3 months
- For portion control, freeze gravy in ice cube trays (each cube ≈ 30 ml / 2 tablespoons), then transfer frozen cubes to freezer bags
- Label containers with date and contents for easy reference
- Lay freezer bags flat to freeze, then stack after freezing to save space
- Flour-based gravies freeze better than cream-based gravies; cream-based may separate slightly upon thawing
Special Storage Tips
- To prevent skin from forming: Press plastic wrap directly onto the surface of cooled gravy before covering container
- For cream-based gravy: Freeze in smaller portions (120 ml / ½ cup containers) as texture may change upon thawing
- Layered storage: If freezing multiple days’ worth, layer parchment between containers for easier separation
Reheating
Stovetop Method (Recommended—Best Texture)
- Pour gravy into a saucepan over low to medium-low heat
- Stir frequently with a whisk or wooden spoon as it heats
- Add 15–30 ml (1–2 tablespoons) chicken broth or water if gravy has thickened during storage
- Heat for 5–10 minutes until steaming and warm throughout (don’t boil)
- Whisk once more and serve immediately
Result: Gravy reheats smoothly without texture changes. Allows you to adjust consistency as needed.
Microwave Method (Quickest)
- Pour gravy into microwave-safe container
- Heat at 50% power for 1–2 minutes (for 240 ml / 1 cup) or 2–3 minutes (for 480 ml / 2 cups)
- Stir halfway through heating
- Check temperature (should be steaming but not boiling)
- Add splash of broth if too thick and stir
- Heat additional 30-second intervals if needed
Result: Gravy heats quickly. May have slight texture change if boiled accidentally.
Double Boiler Method (Gentlest for Cream-Based Gravy)
- Fill bottom pot with water and bring to simmer
- Place heat-safe bowl on top (should not touch water)
- Pour gravy into top bowl
- Stir gently and frequently for 8–12 minutes until heated through
- Add broth if needed to thin
Result: Perfect for cream-based gravy; prevents separation. More time-intensive but safest method.
Oven Method (For Large Quantities)
- Preheat oven to 160°C (325°F)
- Pour gravy into oven-safe covered dish
- Add 30 ml (2 tablespoons) broth to prevent drying
- Bake covered for 15–20 minutes, stirring halfway through
- Stir and serve
Result: Ideal for reheating multiple portions at once.
Do Not Boil
Boiling gravy can cause it to break, separate, or become stringy. Always reheat gently over low to medium-low heat.
Frequently Asked Questions
Q: How do I fix lumpy gravy?
A: If gravy becomes lumpy, immediately remove from heat and pour through a fine mesh strainer. Push gravy through with the back of a spoon to separate lumps. Return strained gravy to clean pan and reheat gently. For future batches, always whisk constantly when adding broth.
Q: Can I make gravy without flour?
A: Yes! Use cornstarch slurry (1 tablespoon cornstarch mixed with 1 tablespoon cold water per cup of gravy base), tapioca starch, or potato starch instead of flour. These create gluten-free gravies with slightly different (but excellent) texture.
Q: Can I make gravy without chicken drippings?
A: Absolutely! Gravy made with chicken broth alone (without drippings) tastes delicious. The broth provides savory chicken flavor, and simple seasonings round it out. Drippings add extra richness but aren’t necessary.
Q: Can I make this recipe dairy-free?
A: Yes. Substitute butter with coconut oil (refined), vegetable oil, or bacon fat for the roux. Use vegetable broth or chicken broth (already dairy-free). Skip any cream additions or substitute with coconut milk. The gravy will be slightly less rich but still delicious.
Q: How do I make gravy less salty?
A: Add broth or water by the tablespoon (15 ml at a time), whisking well. This dilutes the salt content. If overly salty, reheat gently and continue adding liquid until seasoning is balanced.
Q: Can I add meat or vegetables to gravy?
A: Yes! Shredded chicken, cooked ground meat, sautéed mushrooms, or peas work beautifully. Stir in during the final minute of cooking or after the gravy reaches desired consistency. Heat through before serving.
Q: What’s the best side to serve with simple chicken gravy?
A: Mashed potatoes are the classic pairing—gravy clings beautifully to their creamy surface. Other excellent options: stuffing/dressing, roasted chicken, egg noodles, rice, biscuits, roasted vegetables, or toast.
Q: Can I double this recipe?
A: Yes! Double all ingredients and follow the same method. Cooking time may increase by 1–2 minutes for doubling. Monitor consistency and adjust broth/thickening agent as needed.
Q: How long does chicken gravy last?
A: Refrigerated: up to 4 days in airtight containers. Frozen: up to 3 months in freezer bags or containers. Always discard if gravy smells sour or shows signs of mold.
Q: Is homemade gravy healthier than store-bought?
A: Yes, generally. Homemade gravy uses real butter, fresh broth, and simple seasonings with no artificial preservatives, thickeners, or additives. You control salt and fat content. Store-bought packets often contain anti-caking agents and higher sodium.
Q: Can I use chicken bouillon cubes instead of broth?
A: Yes! Prepare according to package directions (usually 1 cube per 240 ml / 1 cup water). Results are nearly identical to store-bought broth. Note that bouillon cubes tend to be saltier, so taste gravy before adding additional salt