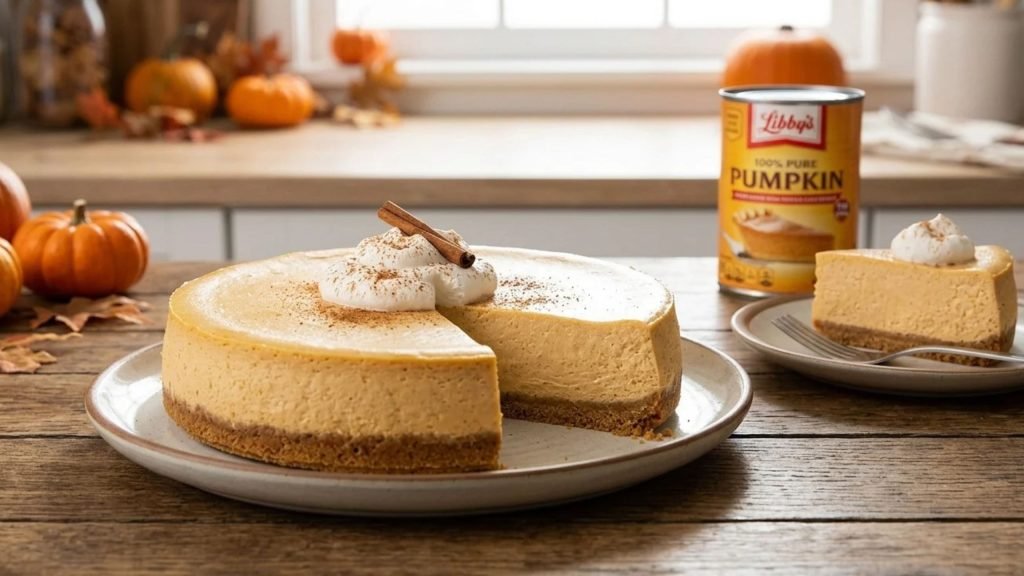
There’s a special kind of magic that happens when you mix creamy cheesecake with the warm, spiced flavor of pumpkin pie. If you’ve been searching for the perfect fall dessert, look no further than Libby’s Pumpkin Cheesecake recipe. I’ve made this treat for years, tweaking it until it’s just right, and trust me, it’s a crowd-pleaser every single time. Get ready to bake a dessert that will have your friends and family asking for seconds—let’s dive in!
Why This Recipe is a Fall Staple
Growing up, Thanksgiving wasn’t complete without a can of Libby’s pumpkin puree sitting on the counter. It’s iconic. But while everyone else was making pie, I wanted something different. I wanted creaminess. I wanted richness. I wanted cheesecake.
Mixing the traditional flavor of pumpkin with the tangy, smooth texture of cream cheese creates a dessert that feels fancy but is surprisingly easy to pull off. It’s the best of both worlds. You get that nostalgic spice kick—cinnamon, ginger, cloves—wrapped in a velvety texture that melts in your mouth.
I remember the first time I made this for a Friendsgiving. I was nervous. Cheesecakes can be finicky. Cracks happen. But this recipe is forgiving. It’s sturdy yet soft. When I set it down on the table, it was gone in ten minutes. That’s when I knew I had a winner.
This isn’t just about following instructions. It’s about creating a memory. The smell of baking spices filling your kitchen is unmatched. It feels like home.
What You Need: The Ingredient List
Let’s talk about what goes into this masterpiece. The beauty of Libby’s Pumpkin Cheesecake recipe lies in its simplicity. You don’t need wild, hard-to-find items. Most of this stuff is likely in your pantry right now.
For the Crust
The foundation is key. A soggy bottom ruins the whole vibe.
- Graham Cracker Crumbs: You’ll need about 1 1/2 cups. You can crush your own or buy a box of crumbs. I like crushing my own because I leave a few bigger chunks for texture.
- Sugar: Just a touch, about 1/4 cup, to sweeten the crust.
- Butter: Melted. 1/3 cup usually does the trick. This acts as the glue.
For the Cheesecake Filling
This is where the magic happens.
- Cream Cheese: The star of the show. You need three 8-ounce packages. Crucial tip: Make sure it is fully softened at room temperature. Cold cream cheese equals lumpy cheesecake. Nobody wants lumps.
- Sugar: 1 cup to balance the tang.
- Libby’s 100% Pure Pumpkin: Not pumpkin pie filling! The can must say “100% Pure Pumpkin.” You need 1 cup of this gold.
- Eggs: Three large ones. Room temperature is best here too.
- Vanilla Extract: 1 teaspoon for that classic bakery aroma.
- Spices: 1 teaspoon of ground cinnamon, 1/2 teaspoon of ground ginger, and 1/4 teaspoon of ground cloves. You can swap this for pumpkin pie spice if you’re in a pinch, but the individual spices add depth.
Step-by-Step: How to Bake It
Ready to bake? Don’t be intimidated. We are going to take this slow. I’ve messed this up before so you don’t have to. Follow these steps, and you’ll be golden.
Step 1: Prep Your Pan and Oven
First things first, preheat your oven to 350°F (175°C). Grab a 9-inch springform pan. This is the kind with the latch on the side. It makes removing the cake a breeze. If you don’t have one, get one. It’s a game-changer for cheesecakes.
Step 2: Make the Crust
In a small bowl, mix your graham cracker crumbs, sugar, and melted butter. It should look like wet sand. Press this mixture firmly into the bottom of your pan. You can use the bottom of a measuring cup to pack it down tight. Bake this crust for about 10 minutes. Then, let it cool. This blind bake keeps it crisp.
Step 3: Beat the Cream Cheese
In a large bowl, beat the cream cheese and 1 cup of sugar. Use an electric mixer. You want this smooth and fluffy. Scrape down the sides of the bowl often. This ensures everything gets mixed. Remember, no lumps.
Step 4: Add the Pumpkin and Spice
Now, add your cup of Libby’s pumpkin puree, the spices, and the vanilla. Mix it well. The color will turn a beautiful pale orange. It smells like autumn already.
Step 5: Add Eggs One by One
Add the eggs one at a time. Beat just until blended after each egg. Do not overmix. If you mix too much air into the eggs, the cheesecake will puff up in the oven and then collapse and crack. Just mix until the yellow disappears.
Step 6: Bake It
Pour the batter over your cooled crust. Smooth the top with a spatula. Pop it in the oven. Bake for about 50 minutes. The center should still be a little jiggly, like Jell-O. The edges should be set.
Step 7: The Cool Down
This is the hardest part: waiting. Turn the oven off. Crack the oven door open slightly and leave the cheesecake inside for about an hour. This slow cooling helps prevent cracks. After that, move it to a wire rack to cool completely. Then, chill it in the fridge for at least 4 hours, or overnight.
Expert Tips for a Perfect Cheesecake
I’ve learned a few tricks over the years. These little secrets make a huge difference between a “good” cheesecake and a “wow” cheesecake.
Room Temperature is King
I cannot stress this enough. Your cream cheese, eggs, and pumpkin need to be at room temperature. If they are cold, they don’t blend well. You’ll overbeat the batter trying to smooth it out, which leads to cracks. Take your ingredients out of the fridge at least two hours before you start.
The Water Bath (Optional but Recommended)
If you are terrified of cracks, use a water bath. Wrap the bottom of your springform pan in heavy-duty foil. Place the pan in a larger roasting pan. Fill the roasting pan with hot water until it comes halfway up the side of the cheesecake pan. The steam keeps the air moist and helps the cake bake evenly.
Don’t Peek!
Keep the oven door closed. Every time you open it, heat escapes. Drafts can cause the cheesecake to sink or crack. Trust the timer. Use the oven light to check on it.
The Knife Trick
When you are ready to serve, run a knife under hot water. Wipe it dry, then slice. The hot knife glides through the cold cheesecake cleanly. Repeat this for every slice. It keeps the pieces looking sharp and professional.
Serving Ideas to Impress
You could serve this plain, and it would be delicious. But why stop there? Let’s dress it up.
Classic Whipped Cream
You can’t go wrong with a dollop of whipped cream. Make your own if you can. Heavy cream, a little powdered sugar, and a splash of vanilla. Whip it until soft peaks form. It adds a lightness that cuts through the rich filling.
Caramel Drizzle
If you have a sweet tooth, drizzle warm caramel sauce over the slice. The buttery sweetness of caramel pairs perfectly with pumpkin spice. Add a sprinkle of sea salt for a salted caramel vibe.
Pecan Praline Topping
Want some crunch? Toast some pecans in a pan with a little butter and brown sugar. Let them cool and sprinkle them on top. The nutty crunch contrasts beautifully with the creamy filling.
Sour Cream Topping
For a tangy twist, mix sour cream with a little sugar and vanilla. Spread a thin layer over the cooled cheesecake and chill it for another hour. It adds a sophisticated finish that looks bakery-made.
Troubleshooting Common Issues
Even the best bakers have bad days. Here is how to fix common mishaps.
Problem: My cheesecake cracked.
Solution: Don’t panic. Cover it with toppings! Whipped cream, caramel, or pecans hide a multitude of sins. It will still taste amazing. Next time, try the water bath method or cool it down slower.
Problem: The centre is too runny.
Solution: You might have underbaked it. If it’s soup, put it back in. If it’s just soft, it will firm up in the fridge. Cheesecake needs that chill time to set properly.
Problem: The crust is soggy.
Solution: Did you skip the pre-bake? Baking the crust alone for 10 minutes seals it. Also, make sure you pack it down tight. Loose crumbs let moisture seep in.
FAQs:
Can I use fresh pumpkin instead of canned?
Yes, you can. But it takes more work. You have to roast the pumpkin, puree it, and drain it well. Fresh pumpkin has more water than canned. If you don’t drain it, your cheesecake might be too wet. Honestly, Libby’s canned pumpkin is consistent and easy. I stick with the can.
How long does this cheesecake last?
It stays fresh in the fridge for up to 5 days. Keep it covered tightly with plastic wrap or in an airtight container.
Can I freeze pumpkin cheesecake?
Absolutely! Bake it, cool it, and chill it completely. Then, wrap it in plastic wrap, followed by a layer of foil. It freezes well for up to 2 months. Thaw it in the fridge overnight before serving.
Can I make this gluten-free?
Yes. Just swap the graham crackers for gluten-free graham crackers or crushed gluten-free ginger snaps. The filling is naturally gluten-free as long as your spices are pure.
Is pumpkin pie filling the same as pumpkin puree?
No! This is the biggest mistake people make. Pumpkin pie filling has sugar and spices already added. Pumpkin puree is just cooked, mashed pumpkin. This recipe calls for puree so you can control the sweetness and spice level yourself.
Making Memories in the Kitchen
Baking is a labor of love. Making Libby’s Pumpkin Cheesecake recipe is a way to slow down and enjoy the season. It’s about the warmth of the oven on a chilly day. It’s about licking the spoon. It’s about seeing your family smile when they take that first bite.
I hope you give this recipe a try. Don’t worry about perfection. Focus on the flavor and the fun. Whether it’s for a big holiday dinner or just a Tuesday night treat, this cheesecake brings a little bit of joy to the table.
So grab a can of pumpkin, soften that cream cheese, and get baking. Your kitchen is about to smell incredible. Enjoy every single bite!